Contents
This in depth article covers ways to use a grading artist 3d LUT file to view your work in Fusion. It’s shows alternatives to using stacked LUT’s, and shows how to test your workflow for clipping. It’s part of a series of articles on Log colour and Linear workflows in fusion.
- Outline of a linear workflow
- Simple Log to Lin workflow in Fusion
- Using Stacked LUTs in Fusion
- Log Maths: Converting between gain and f-stops
How It started
We’ve been looking at a tigher workflow between the Quantel suite and the compositors at Lexhag. While setting up the linear workflow for DPX sequences and LUT files. I noticed some clipping issues in the viewport and started this thread at pigsfly.com. That thread grew into this document from some work arounds suggested by Eyeon’s tech support (who have been awesome), some head scratching, and a bit of maths. As a result this problem has been fixed in the latest version of Fusion.
Log and LUTs
As soon as I load a sequence to start compositing I’ll decide whether I’m working linear and whether I need a grading LUT.
Working in Linear using Log images without a LUT from a colorist.
To work in a linear colour space without a LUT from a colorist, you simply need to convert the images to the color space of your monitor. There is a solid setup for fusion in my post simple log to lin workflow.
Working in Linear using Log images with a LUT from a colorist.
With a LUT from a colorist, I can view my shot with its final look, and compensate for issues that may arise.
The colorist 3d LUT maps the color directly from the Log data to a display (normally ‘rec 709’ ).
Colorist 3dLUT: Log ->rec709.
As compositors working in linear color, we need to create a viewLUT that goes from Lin ->rec709 using the 3d LUT from the grading suite. This is a two step process – first, reversing the Linearization operation to return to the original Log color space, then applying the 3d LUT file to go from Log ->rec709.
Fusion view LUT: Lin->Log->rec709
The setup for working with a colorist’s LUT is no more difficult than working without, BUT the Log-Lin viewLUT must behave correctly to reverse the Cineon tool in the flow editor.
- If the Log-Lin view LUT works correctly you can use a stacked LUTs workflow.
- If it doesn’t you’ll need a work around.
- Use a FUSE instead of the ‘Log-Lin View LUT’ in a stacked LUTs workflow..
- Create a tools macro and copy the settings file to your Fusion\LUT directory.
- Build your Own LUT cube, using a BC node to scale the inputs so that it doesn’t clip.
Testing for clipping
The log tools in Fusion are awesome. But pre build 1118 there was an issue with the view LUT. This is now fixed in the latest build of Fusion. However this article highlights a bunch of useful tricks and tips… It’s still possible to clip our display if we’re not careful with floating point values.
Log-Lin viewLUT Clipping in fusion 6.4 (pre build 1118)
Basically the LUT tools in the ‘Display View LUT’ produced different results to the flow editor.
In particular, the Log-Lin viewLUT clipped highlights (bad), while the Cineon log tool did not (good).
Setting up the Test
It’s gotta be floating point…
If you’re working in LINEAR, Fusion’s viewLUT and flow tools MUST be set to floating point.
Make sure image loaders and creators are set to float16 or float32. Personally, I try to keep the whole flow at float16. I’ve noticed some weird image artefacts when I’ve tried to combine images of different bit depths.
Check The Fusion Preferences.
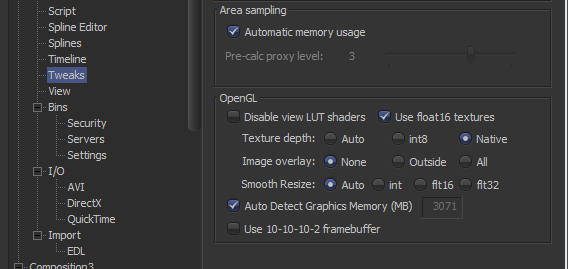
In the Fusion preferences, make sure that the GPU loads images as floating point. If it’s 8Bit, the Lin-log viewLUT will clip super whites to grey.
I think it might be worth restarting Fusion after setting these preferences. I suspect GPU settings are fixed on load but it’s not something I can test.
According to Eyeon’s tech support, these are the settings you need for things to work correctly (if your GPU supports these features).
Under prefs->tweaks->
- Check on ‘Use float16 textures’
- Choose Texture depth: ‘Native’
Checking the Log-Lin viewLUT
With this simple Fusion setup you can check your graphics setup for clipping.
Download the zip file. Unzip the folder into your Fusion/comps
Loader (bypass) -> cineon (Log to Lin) -> cineon (Lin to Log)
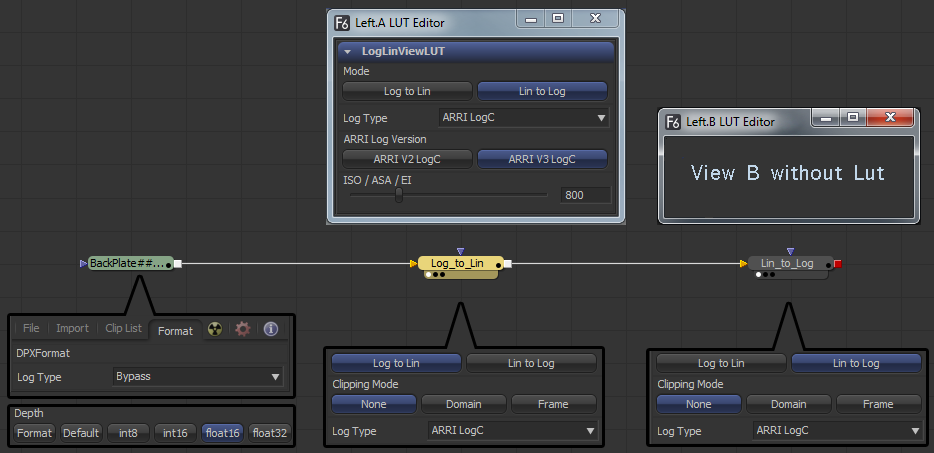
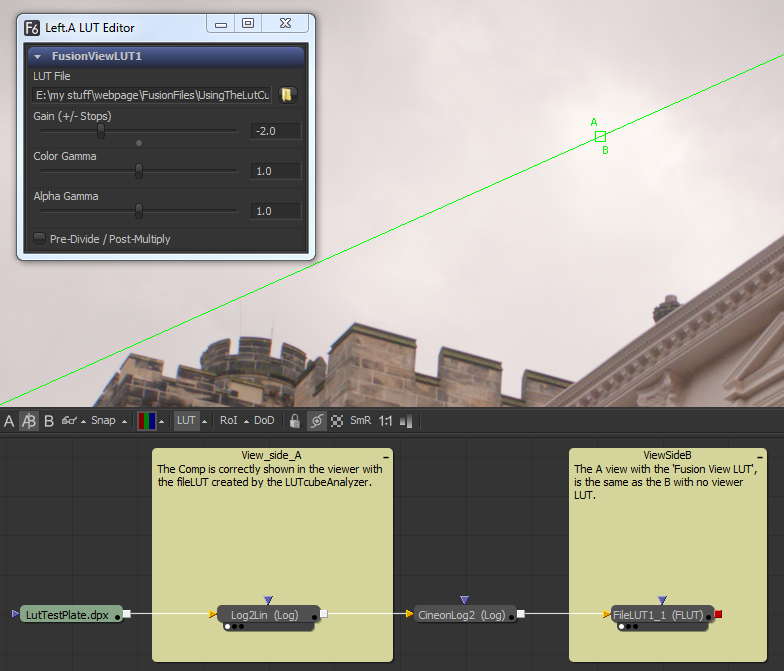
Both the A and B sides of the image should be identical.
- Side A uses a LogLinViewLUT to do a ‘Lin to Log’ operation in the viewer.
- Side B uses a Cineon Log tool to do a ‘Lin to Log’ operation in the flow editor.
If A and B are identical then hazza! Check this post on how to create a stacked LUT to view your work in Fusion.
What the clipping does to the image
If you look at the A/B image below you can see that the sky in the A side is darker than in side B.
The ‘color inspector’ shows the colors to be super white (i.e. R,G, and B all have values above 1.0). The ‘A’ view of the first CineonLog node is clipped to grey by the Fusion LogLinViewLUT.
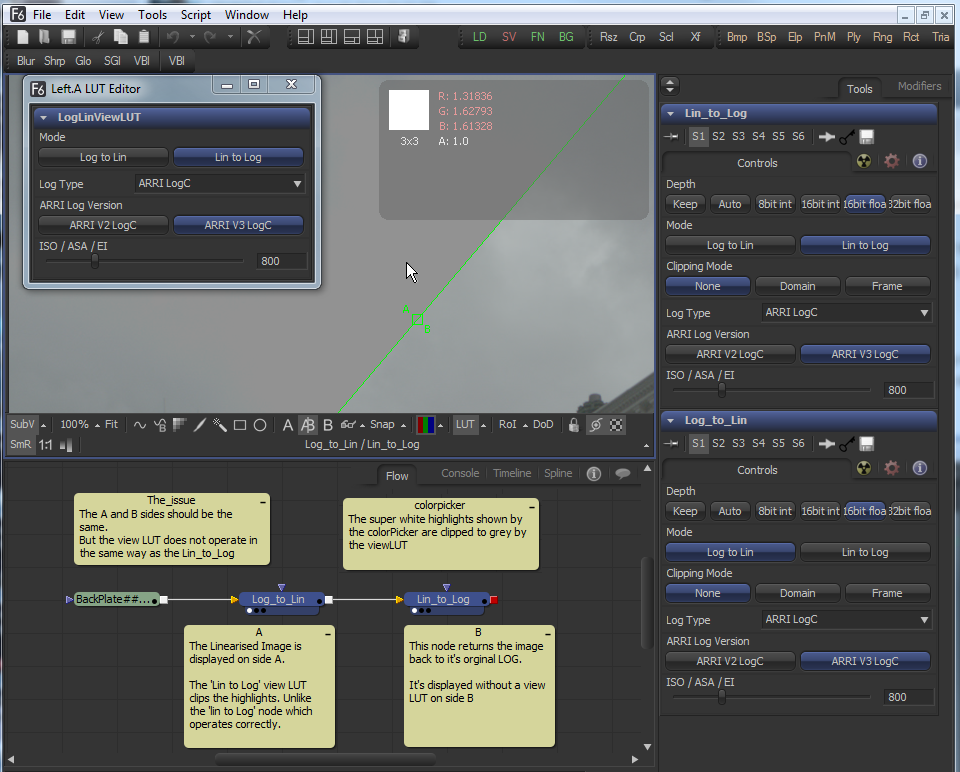
If you have this problem you’ll need to set up a special viewLut to work around the problem.
Working around the Log-Lin ViewLUT GPU issues
Solution 1: Use a macro in the viewLUT
This is a versatile and simple solution. It works in software so you lose the GPU acceleration.
- Make a macro in the flow editor of the tools you need to view the linearised image.
- The copy the .settings file to your LUTs directory (C:\Users\Public\Documents\eyeon\Fusion\LUTs)
- You can now select this macro from the viewLUT menu and get to work (there’s no need to relaunch Fusion).
Solution 2: Use a FUSE rather than the Log-Lin viewLUT
If you are using Arri LogC v3 you can create a stacked LUT without clipping issues. Use this ArriLogC v3 FUSE on VFXPedia instead of the ‘Log-Lin viewLUT’. Simply copy the file into \Fusion\Fuses.
After looking over the code I’m tempted to write my own FUSE for Sony S-Log and RED Log film. If you need something like this then email me.
Solution 3: Build your own 3d LUT cube
This is a cunning solution from Eyeon Tech support. It can be done with a single 3d LUT cube, and uses the GPU. It will do the LIN to LOG operation and apply the monitor LUT simply by using the fusionvViewLut without extra tools.
How does it work?
Normally a 3d LUT cube input only has a range of 0.0 to 1.0. Input values above 1.0 are clipped to 1.0 and input values below 0.0 are clipped to 0.0.
Log files have a range of 0.0 to 1.0. But, the Log to Lin operation expands this range to create super whites and super blacks. If we’re going to build a LUT cube to go from Lin to rec709 we need to normalize these values back to a 0.0 to 1.0 range before applying the LUT.
This Table shows how input values of 0.0 and 1.0 are expanded by the Log to Lin Operation.
| Values after Log to Lin | ||
| Log Type | Min | Max |
| Cineon | -0.0057 | 13.5 |
| Josh Pines | 0.006 | 15.2 |
| ARRI V3 LogC (800 iso) | -0.017 | 55.1 |
| ARRI V3 LogC (200 iso) | -0.016 | 37.7 |
| Canon-Log | -0.027 | 5.5 |
| Panalog | -0.012 | 6.1 |
| RED log Film | -0.0057 | 13.5 |
| Sony S-Log | -0.0056 | 6.5 |
| Viper FilmStream | 0.009 | 1.0 |
Super black values should rarely dip below -0.01. Tiny bits of detail are lost by clipping these negative values to 0.0. Personally, I can live with it.
However, at the other end of the scale a Log to Lin operation can create huge super white values. Clipping these values to 1.0 in the view LUT input can crush half the image. This is a big problem.
So the trick is to scale the color values down to a manageable range before they enter the Fusion LUT tool. We can then make sure that the 3d LUT scales the values up again.
Using the LUTcubeAnalyzer
You can download the example zip file here. Unzip the folder into your Fusion/comps.
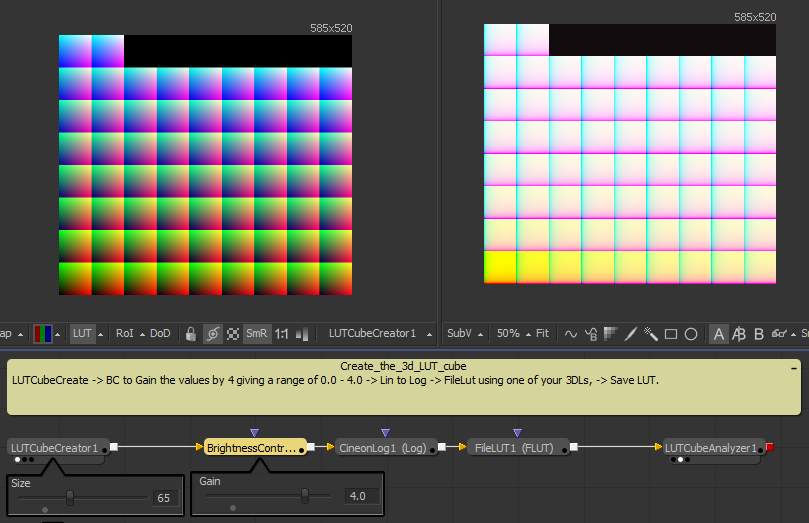
- Start with a LUTcubeCreate tool
- Then use a BC tool to gain the values by 4 ( giving a range of 0.0 to 4.0 )
- Lin to Log using the Cineon tool, and in this case setting it to Arri Log C
- Connect a FileLut using the colorist’s 3DL from the grading suite
- Save the LUT using a LUTcubeAnalyzer.
Note that the LUT created is a 65x65x65 Cube, which makes sure that values do not get truncated.
Applying the viewer LUT
To use the Fusion Lut we need to convert from Gain to Stops (f)
Gain = 2f
Since we’re dividing the LUT input by the original gain value of the BC node. We use a negative value for this gain in stops ( Look at this post on Log Maths.). So to find the Fusion Lut stops setting we use:
Stops = -log2 Gain
Stops = -( log10 Gain ) / ( log102 )
In this example, the values are gained by 4.0 in the BC node. So… In the Fusion Lut, this Gain value becomes -2.0 stops. The example file shows how this works.
- The Loader tool is set to Bypass and imports the image as float16
- Log to Linear (in this example using ARRI LogC). Buffer A shows the Linear Backplate image, using the ViewLUT that was created by the LUTcubeAnalyzer
- Then Linear to Log
- Finally, the colorist’s 3DL is applied. This is viewed in Buffer B.
Further reading: GPU Gems
If you’re up for it then nvidia have released the GPU gems books online.
- Gpu Gems2: Chapter 24: Using Lookup Tables to Accelerate Color Transformations.
- Gpu Gems3: Chapter 24: The Importance of Being Linear.


