


![]() Most illustrator tools have a bunch of extra features only accessible using short cuts.
Most illustrator tools have a bunch of extra features only accessible using short cuts.
Here’s a selection of tips and shortcuts useful for inking images.
TIPS
Live Trace
Import your bitmap (scanned) artwork on the art board by using (File > Place). With the artwork selected got to (Object > Live Trace > Tracing Options…). There are several presets within the Tracing Options window, or you can use the controls to fine tune your own settings.
- Check the preview check box to see your settings applied in real time.
- If its a black and white image check the ignore white checkbox in Trace Settings. This will prevent unneeded white filled paths from being created.
- When you are satisfied click the Trace button.
After your object is traced click (Object > Expand) to turn your artwork into editable paths.
It’s also useful to (Object > Ungroup) a few times
Preserve stroke settings while creating several paths with the pen or pencil tool.
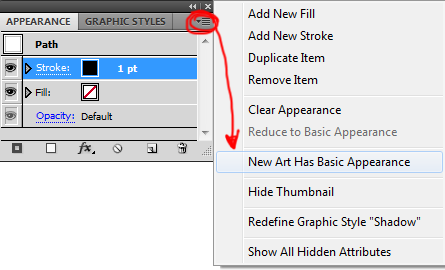 To stop the stroke settings reverting to basic with each new path.
- open the Appearance panel ( Window > Appearance),
- select the fly-out menu
- deselect New Art has Basic Appearance.
Ctrl s to quick save.
This is a reflex action for me now. … I hate losing work from a crash…
If strange things happen because of corrupt settings
See this article describing how to Move the folder and reset the Illustrator preference.
CYMK to RGB
- Go to File » Document Color Mode and check RGB.
- Select everything in your document and go Filter » Color » Convert to RGB.
Layers Tab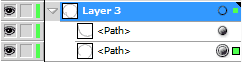
Move selection to new layer
In brief… if you select multiple paths on the artboard you can then click on the small coloured square in the layer view to drag that selection to a new layer. (e.g. In the image the above, click and drag the top right green square ). There is a more detail explanation here .
Dim the image.
When tracing an image its easier if it’s faded. Double click the Layer to bring up the Layer Options dialog. click on the ‘Dim Images To:’ check box and the type in a value for the percentage. Note double click the Layer NOT the image
Visibility
ctrl click a Layer Eye icon to set that layer to outline mode
Alt click a Layer Eye icon to hide everything but that layer.
With the selection tool (V) double click to enter isolation mode.
Tool shortcuts.
Tool settings
Double click a tool in the tool bar to bring up its settings dialog.
Selection tool (V)
Double click to enter isolation mode
Direct selection tool (A)
- hold alt then click to break a handle
Pen tool (P)
There’s a lot a features in the pen tool depending on where and when you click on stuff…
While drawing with the pen tool you can:
- Choose the ‘Direct Selection Tool’ first ( the white pointer) then the pen tool. While using the pen tool hold ctrl to use the direct selection tool.
- While dragging out anchor points – hold space to move the knot – hold alt to break the handles
- While drawing click then drag on the last endpoint to adjust the Bezier Handle for the next path segment. You can also hold alt to break the handles or simply click and let go to make the next line straight.
Extending Paths with the pen tool
Instead of using the ‘Direct Selection Tool’ (white pointer) to select the end point, you use the regular Pen Tool to select the endpoint first, then you can keep drawing like usual!
Eraser tool (shift E)
hold Alt and drag – creates a rectangular selection and erases everything inside it.
Width tool (shift W)
- escape key to deselect a width point
- hold alt to only adjust one side of a width point
- hold alt and drag to copy a width point
- use Shift to select multiple width points
- use the Delete key to remove width points
- double click a wp to access the Width Points Edit dialog.
To edit a path with width, it can be transformed into a closed vector fill. Select the curve and go to Object > Expand Appearance
Shape Builder Tool (shift M)
- alt to subtract
- drag a line to select multiple shapes
- shift drag – drag out a marquee and select multiple shapes
Blob Brush tool (shift B)
Outline mode (ctrl Y)
Toggle outline mode on or off by pressing ctrl Y. Useful when selecting points becomes tricky
Note: ctrl click a Layer eye icon to set that layer to outline mode
Smart guides (ctrl U)
Toggle smart guides on or off by pressing ctrl U