


This is an advanced tutorial. But If you can: add, divide, multiply, and subtract then you can understand the basic maths of colour correction.
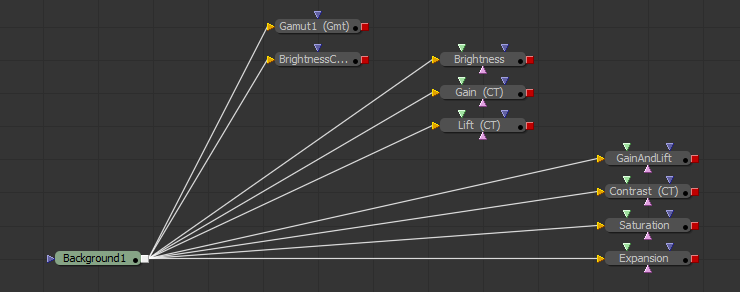
Colour correction using the Brightness Contrast (BC) tool in Fusion
Here’s the original eyeon video on the BC tool by Jeff Kebbs.
BC Tool Operation Order
Its worth noting is that these colour operations are applied in the order you see them. starting at the top and working down to the bottom. This means that while Lift and Gain are somewhat equivalent to the Low and High settings. The Low and High expansion is applied last after all the other adjustments.
Colour correction using the custom tool
The custom tool is great for tricks and fixes when nothing else will do.
Creating a Colour correction expression in the custom tool isn’t complex, and is a good introduction to both subjects. What’s nice about working with colour is that you can see the result of your formula interactive displayed as a graph.
Essentially if we know how we want to modify the white point and black point. Then we can draw a straight line between these two points to create our expression. Jeff Kebbs shows how the black and white points move with the various colour operations ( lift , gain etc ) , and that’s really all we need to know to replicate the Brightness Contrast tool.
If you can: add, divide, multiply, and subtract then you can understand the maths of colour correction. Its relatively simple. But you’ll need to revise the maths of straight line graphs to understand it properly.
You can download my example fusion comp here
Basic colour correction formula
For the calculations the black point is 0 and the white point is 1
- Input is the RGB value going into the colour correction node.
- Output is the RGB value going out of the colour correction node.
Gain
Output = input * gain
Lift
Lift effects the black point but leaves the white point unchanged.
Output = ( input * ( 1 – lift ) ) + lift
This equation is the equivalent to
Output = ( lift * ( 1 – input ) ) + input
Lift and Gain together
Gain does not effect the black point, and lift does not effect the white point.
Output = ( input * ( gain – lift ) ) + lift
Gamma
Changing the gamma does not effect the black point or the white point since:
- 1 to the power of anything is still 1
- 0 to the power of anything is still 0
Output = input(1/gamma)
Contrast
Output = – ( input * (1 + contrast ) ) – (contrast / 2 )
Brightness
Output = input + brightness
Saturation
Saturation is a little more complex. To calculate saturation we first need a Greyscale version of the image. To decrease saturation we then use an weighted blending function which blends the two colours together based on an Saturation value.
Greyscale
Our brains see the luminance of each colour differently. Green appears brighter than red which in turn seems brighter than blue. So the standard is to weight each colour differently when calculating luminance.
By the FCC standard, the formula for Greyscale is = (R*0.299 + G*0.587 + B*0.114).
note that 0.299 + 0.587 + 0.114 = 1
Formula for a saturation adjustment
Output = Saturation * input + (1 – Saturation ) * Greyscale
So when Saturation = 0 we are left with the greyscale image.
Expansion with Low and High
Expansion is somewhat equivalent to using lift and gain, except it has the opposite effect. It sets new black and white points.
Output = ( input – low ) / ( high – low )
This is actually the mathematical inverse of the lift and gain function.
Applications of straight line maths
A lot can be done with the maths of a straight line .

maths to blend between two values