


Introduction
This tutorial will shows the relationship between Filmback, Aperture, Field of View, and Lens size.
Understanding the 3dsMax camera filmback is useful if you want to replicate real world cameras or accurately extend the frame size and crop it later in a composite package.
The setup for the 3dsMax camera is slightly buried. To replicate real world cameras we’ll look in two areas: the render dialog and the camera dialog.
To simplify the process I have developed this MaxScript which is free to download here.
Filmback
The Filmback is the size of the image projected onto the physical medium. It could be cine film or a digital sensor. It is NOT the size of the medium itself, just the area that is used to capture the image.
If you look at the options in the 3dsMax render dialog, you see that 35mm cine film the actual width of the filmback may be 24mm , 20.95mm , 34.20mm ,42.57mm … and wikipedia has a different list here. It can be pretty confusing if you’re trying to establish a ‘standard’ for your studio.
The standard?
In the DSLR world the standard seems to be that a ‘full frame’ camera uses a 36mm x 24 mm filmback. In practice, though, again it seems that different manufacturers use slightly different measurements for their sensor (see wikipedia).
3dsMax Dialogs
The Render Dialog controls the Aperture ( = Filmback size )

Aperture Width should be Filmback Width in the render dialog
The 3dsMax dialog confusingly replaces Filmback Width with Aperture Width in the render dialog. This is a mistake. Aperture and filmback mean very different things. In this article I’ll continue to use Filmback Width just remember to tweak Aperture Width in the render dialog
The ‘Render Dialog’ > ‘Output size’ controls the ‘Filmback’. The horizontal width of the Filmback is fixed using the ‘Aperture Width’ spinner. The other controls effect the ‘Image aspect’ and essentially control the height of the Filmback and relation to the width.
‘Filmback Width’ = ‘Filmback Height’ x ‘Image aspect’
Adjusting the ‘Pixel Aspect’ does not affect the ‘Image aspect’ directly but will affect the size of the frame in pixels. Everything I do needs square pixels these days so I always set the ‘Pixel Aspect’ = 1.0.
The Camera dialog controls the FOV and Lens Size

The ‘Lens size’ and ‘FOV’ are clearly displayed in the Camera Dialog.
If you click and hold on the button next to the FOV spinner you’ll find the ‘FOV direction buttons’. Using these buttons you can set the direction of the FOV calculation. The max default is horizontal.
Changing the ‘FOV direction’ doesn’t affect the camera setup or aperture width in the render dialog, only the way the FOV is calculated

To see the relationship between these parameters – ‘Lens size’, ‘FOV’ , and ‘Filmback Width’ – you’ll need to do a bit of maths…
The Maths
Fortunately the maths isn’t too hard. The standard 3dsMax Camera treats the lens as a pinhole. This makes the maths a simple issue of trigonometry.
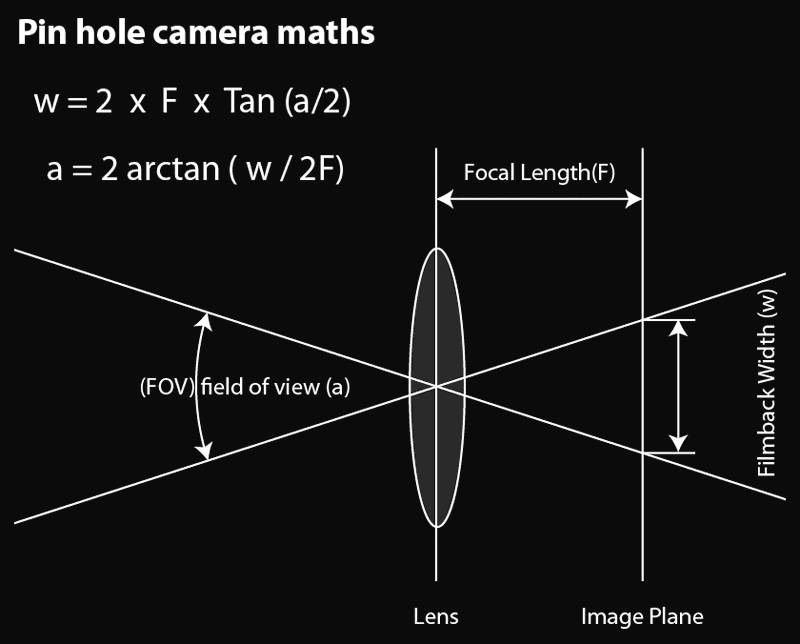
Depending on which ‘FOV direction button’ you have chosen you might need to do some maths to calculate ‘w’ in the equations based on the settings in the render dialog.
- Horizontal FOV: w = filmback width
- Vertical FOV: w = filmback width / ‘Image aspect’
- Diagonal FOV: w = √ ( (‘filmback width’)² + ( ‘filmback width’ / ‘Image aspect’ )² )
Extending the frame while preserving the original lens
Sometimes I’ll find I need a bigger frame (and image size) to get the coverage I need for a composite. If you are doing lens distortions, warps or blurs in post, you may find it creates black areas at the edge of the frame. This can be hard to hide.
Wouldn’t it be nice to extend the frame with extra pixels and crop it back to size later?
Adding pixels to the frame height.
Adding height to the frame is easy. Just dial in the extra pixels you need in the render dialog. The camera setup is preserved and the extra height is applied symmetrically. Basically, whatever you do in the render dialog 3dsMax will always preserve the vertical framing of the camera. If you overlay images rendered from the same camera with different frame heights they should all line up.
Adding pixels to the frame width.
If your aim is to crop back to to the original frame later, adding height to the frame will involve a few steps and some simple maths.
First note down the original values for:
- the Lens (mm)
- the ‘Filmback width’ (mm) ( remember this is ‘Aperture width’ in the render dialog )
- the ‘Image width’ (pixels)
Next adjust the ‘image width’ (pixels) to the new value. Note that this doesn’t affect the camera’s horizontal FOV. To fix that you will need to do some maths to calculate a new ‘Filmback width’.
new ‘Filmback width’ = original ‘Filmback width’ x new ‘Image width’ / original ‘Image width’
Put this new ‘Filmback width’ into the Aperture width spinner render dialog.
Finally, go back to the camera and set the lens size back to its original value.
Reference
For sensor sizes I use the Digital camera pocket guides theblackandblue.com/pocket-guides/
Recently I’ve discovered the VFX camera database at http://vfxcamdb.com/