Here we go then …
I’ve just started with V-Ray after years of using mental ray. I’m trying to be methodical but there is a lot to learn… Here are my notes on things that tripped me up and the new features I need for VFX.
V-Ray Dome light with Sky Texture
 For compositing we need the background to be black while the forground elements include reflections and Gi from the sky. In Mental Ray this is done with a Ray Switch Map but in V-Ray we can use the Invisible option in the VRay Light.
Background Alpha Issues
When the Dome Light is Visible the texture also appears in the Alpha channel of the Render. Setting the Invisible option also sets the background alpha to black.
V-Ray Frame Buffer window ( VFB)
http://docs.chaosgroup.com/display/VRAY3/V-Ray+Frame+Buffer

Use ‘save all Image channels’ to or save as an .exr file get deep pixel info out of the V-Ray Frame Buffer window.

Show the frame buffer History dialog by clicking the little H button at the bottom.
Texture antialiasing
V-Ray does not support Max’s mechanism for supersampling materials and maps. Instead, texture antialiasing is controlled by the image samplers. By default V-Ray antialiases everything in the image, including textures.
V-Ray Elements and G-buffer
V-RAY3 Render Elements online Help
Getting elements out of 3dsMax needs some experimentation. V-Ray Adv works with everything But while V-Ray RT does support elements in version 3.0 many seem broken.
There are two different dialogs for saving V-Ray passes.
- The standard 3dsMax .exr file dialog which deals with the g-buffer
- V-Ray Frame Buffer dialog. This has an option to save a V-Ray RAW file
The standard .exr file dialog only deals with the g-buffer. The option to save V-Ray elements along with the g-buffer channels does not seem to work . Plus, as far as I can tell, the g-buffer is only functional with the V-Ray Adv renderer and not V-Ray RT. Which is a shame 🙁
Jokermartini has a tutorial : deep compositing 3ds max vray nuke
Elements For lighting
V-Ray has many different Render elements. There are various possible setups depending on the complexity of the scene and the detail need in the composite.
General all the lighting elements a simply added together to create the final composite. But:
- Work in a linear colour space, or the maths goes wrong and the lighting is way to dark.
- Ideally use 16 or 32bit float .exr files for rendered images.
- RAW elements need to be multiplied by a colour element before being added to the final comp ( see below)
Gregory Chalenko has a good article on Vray lighting passes in fusion
There’s also a great article from Pixar http://renderman.pixar.com/view/TGT_Compositing
Basic Lighting Breakout
GI + Direct + Reflection + Refraction + Specular = Beauty
Elements For a Detailed Lighting Breakout
VRayRawGlobalIllumination and VRayRawLighting elements must be multiplied by the VRayDiffuseFilter element before they are added to the final image.
- VRayRawGlobalIllumination x VRayDiffuseFilter = VRayGlobalIllumination
- VRayRawLighting x VRayDiffuseFilter = VRayLighting
- VRayRawGlobalIllumination
- VRayRawLighting
- VRayRawReflection
- VrayRawRefaction
- VRayRawShadow
- VRayRawTotalLighting
- VRayDiffuseFilter
VRayRawLighting + VRayRawShadow = lighting without shadows
The VRayRawShadow is unusual. It can be added to the VRayRawLighting to adjust the shadow intensity. Simply adding the two elements produces lighting as though no shadows were computed.
EXR files
VRayOptionRE is a special render element that controls settings for V-Ray that are otherwise unaccessible. It does not create an actual image but does control several important exr settings.
V-Ray Utility elements
MultiMatte Element
 This element creates an RGB image. Each colour channel is a mask based on a material ID or Object ID.
The advantage of this technique over VRayMtlID or VRayObjectID is that each mask is antialiased
VRaySamplerInfo
This powerful element has a bunch of options for different utility passes including.
- Point ( Good for world space position pass )
- Normal vector
- Reflection vector
- Refraction vector
- UVW
- Normal Vector with bump mapping
Its possible to use multiple VRaySamplerInfo elements in each render
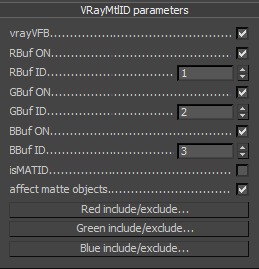
ID Element are not anti-aliased
VRayMtlID and VRayObjectID are Integer ID passes and are (correctly) not anti-aliased. Normally when compositing they should be multiplied by a coverage mask to give the correct alpha. Alas I can’t find a Vray coverage element for 3dsmax. But we can create one from the g-buffer using the standard .exr dialog ( but only in V-Ray Adv not V-Ray RT)
Note: Normally I’ll set up simple: Red,Green,and Blue self illuminating materials to do masking rather than ID elements. Because it’s easy, and I get nicer antialiasing.
Zdepth (in camera space )
It’s worth noting that the V-Ray ZDepth pass is correctly calculated as the distance of each pixel from the lens nodal centre.
Often in CG (especially games ) the zdepth is crudely calculated as the perpendicular distance of the pixel from the camera plane. This means that in the corners pixels have z values that are too close to the camera.
In the viewport the V-Ray camera clipping plane is flat . Because its not curved when we use it as reference for the Z depth pass we need to push it slightly further back. This will make sure the Z depth element does not go out of range.
Like many renders the depth is saved as 1/z
Upgrading the VRay License to a new version
While the license server is running your VRay license server webpage is found at http://localhost:30304/getstatus Scroll to the bottom to find the Upgrade License Link
Network Rendering
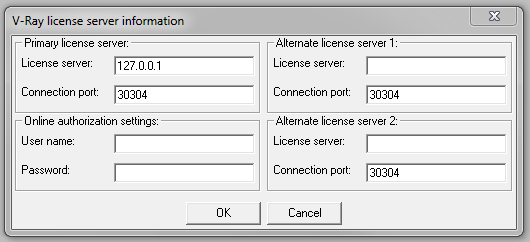
Network rendering works pretty simply through Backburner. Just remember to set the server address in the V-ray License server Information of your render slave.
In Programs > ChaosGroup > Licensing > Administration you’ll find the ‘Change V-ray client Settings’ exe
Add the IP or computer name of your server here.
127.0.0.1 is the Localhost.
Tuning the Vray settings
Tuning vray to improve render times is a bit of a dark art. In principle the are various rules of thumb that can be learnt to balance the various settings this prevents computation time being wasted on details that wont be seen.
The new Vray quick settings tool is really useful . But ideally the render settings and materials need to be tuned together so a bit of maxscripting may be needed to help . For those of you who want something of the shelf there is solidrocks
There are some good tutorials online. If you’re just starting then I recommend doing the following tutorials in order.
Akin Bilgic has a beginners tutorial here for optimizing VRay settings by hand.
Toni Bratincevic has this tutorial on Demystifying V-Ray DMC Sampler
John O Connell has this vimeo tutorial on Arch vis renders
Links
Chaosgroup help page for 3dsMax VRAY3
chaosgroup licensing vray
Info/news/tutorials
vray.info
vrayelite.co.uk
VRaymaterials.de – VRay material library and forum
Making sense of VRay Settings