Its useful to hide objects in the scene from the camera yet still have them contribute to the lighting. This means that other objects in the scene will still receive shadows and reflections from the hidden objects. This especially important for compositing . Here are a few useful tricks to help manage xReferences in 3dsMax
Tag Archives: V-Ray
Here is a breakdown of the work I did for Lexhag creating the mines in Poldark. Shot on location in Cornwall my job was to digitally extend the existing ruins,to rebuild the Grambler and Poldark Mines
Shadows help place the CG elements in the world. Literally grounding it in reality. Rendering them is easy, but for more control we need to separate the shadow layer for compositing. Creating them in 3dsMax isn’t hard and here’s how to setup V-Ray to separate the necessary passes.
Setting up the VrayNormalMap in 3dsMax
The correct setup for the using the VrayNormalMap in 3dsMax, isn’t hard but there are a couple of things to watch out for.
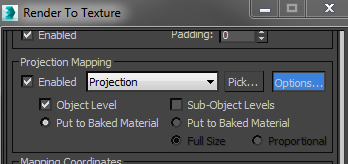
Set Maps to 100
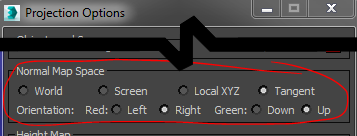
Green is up and Red is right
So when baking out normals for Vray textures I use the scan line renderer with the following settings.
Note for substance designer
I believe that Green Up is OpenGL style while Green down is DirectX
Gamma is 1.0
If you’re using the recommended linear workflow using by enabling Gamma/LUT Correction in the max preferences you’ll need to make sure the Normal map loads with the correct linear Gamma.
To stop 3dsmax applying a reverse 2.2 gamma to your normal map go into the image file dialog and set the gamma to: override 1.0
The image looks wrong in the preview but will be correct in the render.
People are also using a 3dsmax composite node to fix gamma issue. But the composite node is not supported in VRay RT.
A few work in progress shots of my sci-fi concept vehicle. Straight out of 3dsmax using VRAY. Not really meant to be seen this close hence the minimal detailing and texturing.