


The creature creation process must encourage efficiency and facilitate exploration. Later decisions should build on earlier decisions rather than be hindered by them.
This process helps make the right decisions at the right time.
Overview
As artists cycle through different industries, ideas and techniques cross pollinate. Games and film share a similar process. Although in later stages of development, High end film and high games require certain specialisations.
Stage 1: Concept development and asset creation.
- A mood board starts to turn words into pictures. It will give everyone a visual reference as they make decisions. ( Pictures speak a thousand words )
- Concept art explores and unifies the separate mood board elements to determine the overall look of the model.
- Once the concept is approved work begins on the high-res sculpture. All the visual elements are brought together, and everything must be detailed: fat, muscles, even wrinkles and skin pores.
- Once the client approves the sculpt look development beings. The model is textured, and shaders are created to define how the surface responds to light.
- At this point the creature cannot move. The model must be retopolgised to create a mathematical subdivision surface that can be rigged and animated. This subdivision surface is initially tested with a basic skeleton and then further refined with muscles and facial expressions.
Stage 2: Creating the shots
When the rigged character is signed off, work can start on the shots.
- Virtual cameras are carefully tracked to replicate the movement of their real counterparts. Proxy meshes are created match the real world so that light and physical interactions can be simulated.
- For each shot the animation blocked out and pre-visualised. Once it is signed of by the animation supervisor a low res render is set to the client for approval.
- Once the animation is finalised and approved , lighting and rendering begins. The virtual model is lit to match the real world.
- Finally a rendered sequence of the creature images are composited into the original background plates. Details like shadows, film grain, depth of field, motion blur, smoke etc are corrected until we full believe that our character really existed in that location.
Developing the concept
The Brief
Creatures start with words, and a purpose. Some of this written down. Some simply felt. Others need to teased from the directors imagination.
Verbal descriptions must be transformed into something we can see. What does “quick” look like? Abstract ideas are not enough. Questions must be answered so our limitless imagination can be distilled into a single form.
Mood boards.
Mood boards are an effective starting point for any design process, and can be quickly created from Internet images.
Anything that we ‘feel’ connects to the design is suitable.
We might look for specific individual features Like: Silhouette, colouring, skin or, materials. or just something that reflects the right tone. Images do not need a direct correlation eg: for a robot we could include seashells or a for spaceship perhaps squids.
They give the team something to point at. While making visual decisions. It much quicker to point at something and say I like or don’t like that .
As the design progresses mood boards become the start of a visual reference that grounds the design in reality.
Note competing aesthetics.
It may not be possible to incorporate all the collected visual elements together. If different routes emerge for the design (e.g. fat vs thin ) then a decision need to be made on which route to follow before moving onto the next stage.
Initial concept and illustration.
Here we start to collate disparate mood board images into a coherent design.
Silhouettes
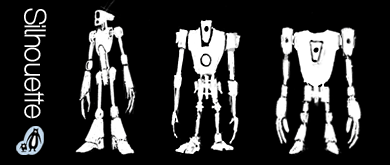
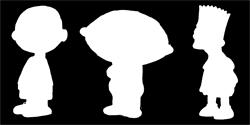
Small thumbnails sketches or simple black and white silhouettes are very useful in the initial stages.
It can be a mistake to get distracted by details early on. The basic idea is enough.
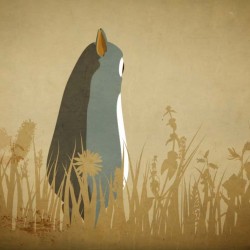
Good thumbnails can be very suggestive of the final form. We can see that strong cartoon silhouettes are easily recognisable.
3D concept.
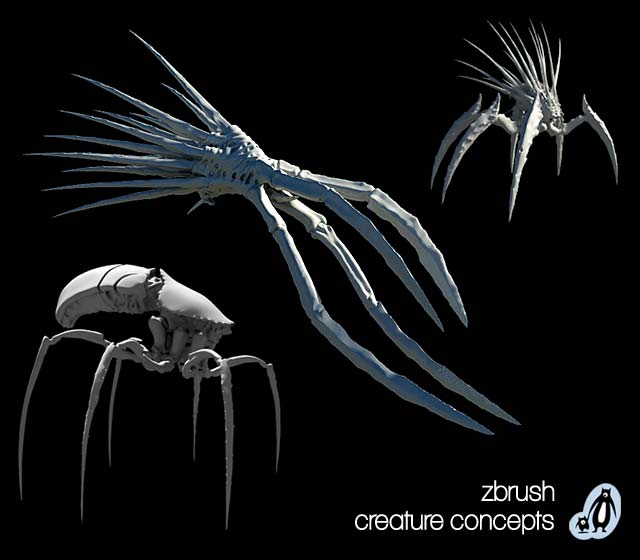
Soon we should have a sense of what works and what doesn’t work. At this point we can add some mid-level detail to one or two of our designs. Polished production illustrations always great to see. Modern 3-D sculpting tools like Z Brush enable artist to quickly concept models in 3-D. This can be a great timesaver when moving forward into the next age.
Check the 3D model in it’s environment.
Get something in game that resembles your character and have a look at it as soon as possible. It doesn’t need textures. It doesn’t need rigging or animation. Just drop it and have a look. Is it to big or too small. Is the silhouette distinct enough from other characters. Show it to the team and imagine how its going to move and what’s it going to do.
Creating the asset
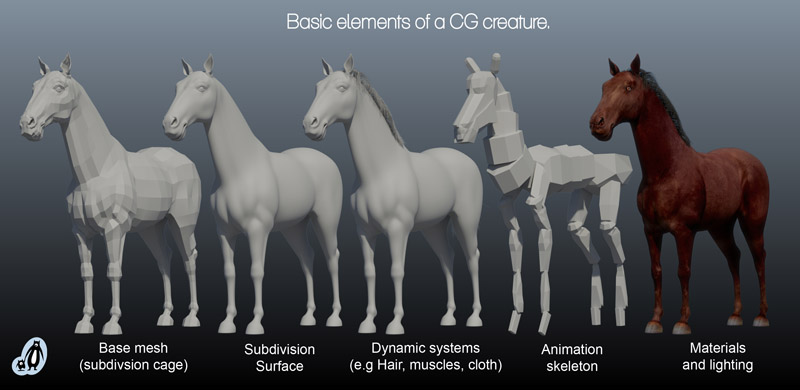
Hi resolution 3d sculpture.
Once the scale and form of the creature have been finalised and signed off. The final zbrush sculpt can begin. This process can take a very long time and it’s not something we want to redo. Ideally the main features have been made clear by the concept development, so all that is left is the finer details.
Retopologise to create a subdivision cage.
There no automatic method of going from a high res 3d sculpture to an animated creature. But there are a variety of tools that can help. Various tools allow us to paint new polygons over an hi resolution existing model. The new surface is sucked down and conforms to the old one. Slowly a new mesh is built up that follows the contours of the original.
Create an animation rig to test and finalise the mesh topology.
There’s no point creating a beautiful character model if it falls apart when it moves.
Texturing
Create UV layout
Export technical passes for the texture artist.
Project normal and ambient occlusion maps from the 3d sculpture to the animation model
Paint textures for diffuse colour and other material qualities.
Rough materials have little shine where as smooth metals can be almost perfect mirrors. CG methods are constantly evolving and with latest tools we can now paint with materials rather than just colour.
 The art of budget animation is much like the art of budget live action movies. Can we create something compelling with a small cast of characters in a single location? The answer is of course ‘yes we can’ given a good idea and a good script.