


Python for CG pipelines.
Python 2.7 is the tool of choice for linking CG pipelines. Custom tools speed up repetitive workflows and help you concentrate on the art rather than data entry or trouble shooting. You can create python tools to enable CG packages to talk to each other and to shot management software such as FTrack and Shotgun.
Python has a massive online presence and one can find code snippets to do almost anything. To some extent the hard part is choosing the best tools out of a vast array of choices. Here is my setup.
Installation
Install python2.7
https://www.python.org/downloads/
If you’re running a 64bit version of windows make sure to look for the Windows x86-64 MSI installer.
Setup python environment
Add Python path as an environment variable
My Computer > Properties > Advanced System Settings > Environment Variables >
To the system variable path add
c:\python27;c:\python27\scripts;
To check if its working simply open the command window and type
python
more info here https://docs.python.org/2/using/windows.html
Check the video here video tutorial: adding python to a DOS path
Install pyside
with python 2.7 you can install pyside directly using pip
Open the cmd ( command window ) in windows and simply type
pip install -U PySide
Install qt
You can get the latest version of Qt from there site. There are various flavours but if you happy to go open source then download it here http://www.qt.io/download-open-source/
If you do go open source share your code on gitHub
QTdesigner and pyside
Qt Designer is a basic UI designer for Qt. It’s worth take time to understand the layout framework. but really its pretty simple to use and you can get upto speed quite quickly.
QtDesigner creates .ui xml data. To turn it into something we can run we first need to convert it to Python code. To do this we use the pyside-uic command.
https://wiki.qt.io/QtCreator_and_PySide
pyside-uic mainwindow.ui -o mainwindow.py
You can do this in the command window but if your doing a lot of work on the same file I find it quicker to create a .bat file in the same folder as your .ui file.
Sub class the Qt UI generated by pyside
My notes from This tutorial
Because Qt UI file is automatically generated you do not want to make edits directly to it. Your edits would be overwritten everytime you update the UI in Qt-Designer
This means that in order to interact with the GUI that we have created in Qt Designer we need to create a separate file for the rest of our application code.
By subclass our Ui_mainWindow class we can extend it with the functions we need like this
import sys
from PySide.QtGui import *
from PySide.QtCore import *
from ui_mainWindow import Ui_mainWindow

class MainWindow(QMainWindow, Ui_mainWindow):
    def __init__(self):
        super(MainWindow, self).__init__()
        self.setupUi(self)
        self.assignWidgets()
        self.show()

    def assignWidgets(self):
        self.goButton.clicked.connect(self.goPushed)

    def goPushed(self):
        self.goText.append("Go, Go, Go!")

if __name__ == '__main__':
    app = QApplication(sys.argv)
    mainWin = MainWindow()
    ret = app.exec_()
    sys.exit( ret )
Useful Python APIs
FTrack
Ftrack API is very simple to use and is well documented. It also needs a pathmap added to the PYTHONPATH user variable, there is an option to do this automatically during the installation.
EPP
The Eyeon production pipeline is an open source project for shot management. Its based around BMD Fusion and Generation.
https://github.com/eyeonSoftware/epp
https://github.com/eyeonSoftware/epp/wiki/Installation
BMD Fusion (only uses 64bit python)
The latest version of fusion 7 has python console . But it only works with 64bit versions of python2.7+ or python 3.4+
The is a community driven python project here: https://github.com/BigRoy/fusionscript
Evernote
This webclipper and collaborative documentation tool has a python API (and many others). I’ve yet to use it. If anyone has experience please comment.
pywin32
pywin32 is a python library to talk to the Windows API and registry. This is needed to set system wide environment variables. Get the proper version from: http://sourceforge.net/projects/pywin32/files/pywin32/Build%20218
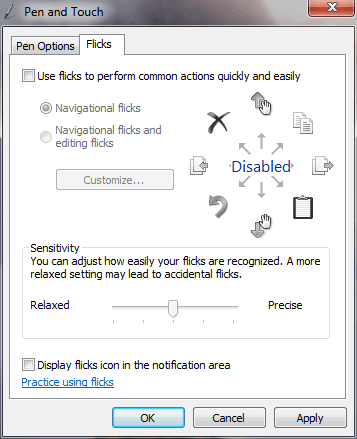 How to disable flicks