My 3dsMax previsualization tool. It allows you to jump cameras and time to previs scenes. It is available for free see the install instructions here.
In Kyudo ( Japanese Archery ) there is a saying. Which I’m loosely going to paraphrase as-
“Don’t concentrate on the target. Concentrate on making the perfect shot.” Continue reading
A bit of geek love for this. A nice way of creating glyphs from the english language.It’s called Dscript

Looks like this when joined up

3dsMax EXR motion vectors.
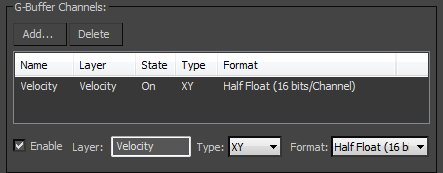
 The best option is to use the Motion vector G-buffer in 3dsMax.
X : positive is Right – Negative is Left
Y: positive is Down – Negative is Up
In Fusion

Using the G-buffer fusion in is simple.
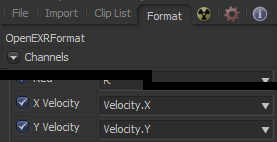
In the Loader chose the G-buffer channels for the X and Y velocity.
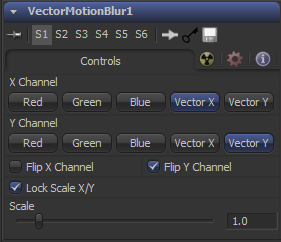
 Then flip the Y channel in the VectorMotionBlur tool to point the vectors in the correct direction.
In Autodeck Composite (toxik)
The Toxik blur tool is actually very cool. The fact that DOF and motion blur are packaged together in one tool is a real advantage over Eyeon Fusion.
This video covers motion vectors in 3dsMax and Autodeck Composite (toxik). But the information can be generically applied. There’s a couple of issues which he fixes in his next video
VideoTip #18 – How to use a Motion Vector pass from MAX’s Scanline renderer!
There’s also a longer in depth look at motion vectors and some fixes if the tools don’t quite behave as they should do.
VideoTip#21 – In-depth view of Motion Vectors from MAX to Composite!
Its simple really.
Now with latest version of eyeon Fusion working camera LUT’s couldn’t be easier. The profiles are all included. The my new workflow is very simple.


