sci-fi London 48 hour challenge: Back Issue

Once again its the sci-fi London 48hour short film competition. It gets bigger every year , and this time I almost managed to get some sleep.

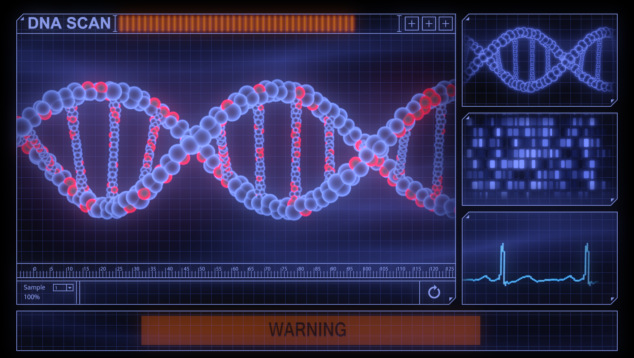
I had a lot on over the weekend so couldn’t join the #TheCreepyGuys on location. It wasn’t until Sunday afternoon that I could get down to Modelling the DNA and Skeleton.

Spine_Gui

dna_Gui

I was beginning to feel squeezed for time but fortunately my house mate Dan gave up his Sunday evening help out.

We spent a while looking at  Jorge-Almeida’s work and some Oblivion UI’s. While they had weeks of design work compared to our hours. It gave us something to spring our ideas off.

Dan then moved on layouts in Adobe illustrator while I wrangled with the 3d elements and composite tests

With work the next day Dan went to sleep at midnight. But I kept tweaking the 3d elements until I got the final locked cut from Karel at 5am. That left me 4 hours for 6 shots on no sleep !

I liked the idea of a simple Blue colour palette to contrast with Red danger areas. I needed next to nothing render times to reach the morning deadline. After a couple of test I decided to use the Max Scanline render for the particles and Fusions OGL renderer for the skeleton.

I needed every minute of the 4 hours to drop all the elements into place and match Alix’s performance. But I got the final shot to Tom at about 8 in the morning, leaving him just enough time to render short and deliver it to the judges.

As ever there is loads more I would like to have done. I made some pretty cool particle tests to represent DNA sequences. We left a big space for them in the GUI. But alas there simply wasn’t time to add them.

It’s a joy to work with such a talented crowd. Hopefully I’ll see them all at the cinema for the final.

Quick setup proxy and overscan sizes with my 3dsMax Camera resolution tool

Frankly the default 3dsMax render settings bug me. They don’t deal with modern cameras. The proxy settings are hard coded and can’t be changed. There’s no easy way to create over-scanned frame without a calculator. So I’ve written my own tool to fix these problems and you can download it for free. If you want to know more read my article on basic camera maths in 3dsmax

Check out the installation instructions here.

Continue reading

Costing animation: good ideas with a good stories win

Da_n_flowersThe art of budget animation is much like the art of budget live action movies. Can we create something compelling with a small cast of characters in a single location? The answer is of course ‘yes we can’ given a good idea and a good script.

With animation I find there are three categories of cost

  • Cost to plan
  • Cost per asset
  • Cost per shot

Cost to plan

  • Script
  • mood boards and concept art.
  • storyboards
  • Management and scheduling

Cost per asset

(per character , per environment , per prop )

  • Modelling
  • Rigging ( connecting the model to a skeleton for animation
  • texturing ( The colour of the surface )
  • material shaders ( how the surface responds to light … is reflective, dusty, matte transparent etc… )

Cost per shot

  • Animation time
  • special FX expositions etc
  • Lighting and rendering
  • Compositing (layering different images and movies together to create the final shot )
  • Sound design
  • Music
  • Editing

For a fully CG animation literally every blade off grass must be made and placed in our virtual world, and every hair on a characters head must be combed into place. We must be virtual makeup artists, carpenters, hairdresser, tailors, photographers etc.. All the jobs of a liveaction movie are recreated virtually.

Photoreal CG is a lot of work. Costs will add up into thousands of pounds per character and per shot. With games costing many millions to create there are huge marketing budgets, and we have been wowed by many epic animations costing hundreds of thousands.

So the art of budget animation is to minimise the number of locations and the size of the cast. But With animation we also have the advantage of creating simplified styles (like southpark or monty pythons cutout animation ) and this can greatly reduce costs.

We have a range of styles to chose from. Here they are in order of cost

  • Stills with sound and music ( like a moving comic )
  • 2d Animated Cartoon Cutouts
  • 3d Animation in a cartoon style
  • 3d Characters composited into photographed environments
  • 3d characters in fully 3d worlds

… good ideas with a good stories win

With a good script all of these styles can deliver a compelling story. We can blind our audience with stunning visual FX. But a good idea with a good story will do the job just as well, and we can get the message across  for considerably less money.

On the flip side holes in the script only get worse as the production develops. Its very hard to fix a bad story in post…

A good production methodology helps.

The deeper into the production we get the longer everything takes. There’s no point polishing a shot if it’s not needed. Good story boards and previs will save time in the long run.

This process is beautiful described in this short  The story of animation


Faking Reflections on set.

It’s all smoke and mirrors.

This came up recently because there was no glass in the window of the set. All the reflections were to be added in post from photos…. but when the actor stood at the window the Director wanted to see his reflection.

This is a simple trick for a locked off shot. The action is filmed with two cameras one for the main image and a 2nd camera for the refection.

You can find the position of the main camera simply by reflecting the main cameras position in the mirror plain.

  • Both cameras are equidistant from the mirror and targeted at the same point on the mirror plain.
  • A line connecting the nodal point ( focal center ) of each camera is perpendicular to the mirror ( at 90° )
  • both cameras should have the same FOV.


Fake_reflections

Outline of our linear workflow

This is the outline of our linear workflow. It works for both Fusion and Nuke.Viewing Linear workflows

The Composite

Setting up our linear workflow is relatively straight forward.

The key points are:-

  1. Inputs and outputs are 10 bit dpx files.
  2. the log to linear operation should match the camera profile ( Cineon, s-Log, Arri log c, etc )
  3. the log to linear operation on the input is inverted for the linear to log operation on the output.
  4. Composite with a floating point colour depth.

The Display

There are two methods for viewing the composite.

  1. No LUT file.  Without a grading LUT the only option is to apply a simple gamma to view the composite.
  2. LUT files. If a Colourist is involved then the linear image MUST be converted to a log plate before the LUT file is applied.

Further reading

  1. Simple Log to Lin workflow in Fusion
  2. Using Stacked LUTs in Fusion